In the last blog we created a quilt using the easy draw tools and we only used straight lines in this blog we are going to look at blocks with curves EG drunkards path and double wedding ring.
EQ8 allows you to create blocks without drawing. The open library button is a new feature of EQ8 by clicking on this button it gives you access to the appropriate library for the set of tools you want to work with in this case the block tools. If we open the block library we can see the index of types of block, I want to work with a compass block so if I click on compass it will open a list of all the compass blocks.

The one I want is the one in the right hand corner. If I click on it it will open in the work table as a line drawing but if I click on colour it will appear in the colours in the index.

On this worktable you can edit your block, you can make design changes, colour and and size. I decided to make my block 14″ square. My main reason for this that each quarter is 7″ square which means I can print it out on my A4 printer. (You can printer bigger blocks but you would have to tape your printouts together or buy a bigger printer).
If I click colour EQ8 will automatically colour the block using the default colour scheme.

This for me is where the fun starts because you can experiment with colours. This is one version I created using the fabric panel in the work table.( This was covered in the last blog.)

From here I used the layout table to set the layout, size and number of blocks I wanted in my quilt. (covered in last blog) and I designed this quilt. After a little practice this stage is quite easy and quick. This is the design I have been playing with.

Here I just wanted to demonstrate a basic idea of how you can easily create complex blocks. From creating your block it is quite easy to design a quilt round it. This is one idea I have been playing with. EQ8 has a massive advantage over hand drawing has you get a clearer image of what your quilt will look like, you can change the design and audition colours and fabrics.
It doesn’t take a lot of practice to open and edit blocks or to design a quilt using the libraries. It does however take more practice to draw blocks with curves, you can draw curves using easy draw arc tool but I have not had much success with it. I will admit I am impatient and if I don’t pick things up fairly quickly I give up. I find it easier to use the poly draw feature for drawing curves.
Polydraw uses a tool that is most often used in CAD programs, but my husband says it is not like any CAD programme he used as an engineering draughtsman, I did point out to him that it was quite a while ago since he retired.
This type of drawing can be a lot of fun because there are special grids that make designing easy. You can see there are six grid options, I am going to use the arc tool to draw my block.

When you click on the arc grid it will open as a grid, as shown on the worktable, you can then draw the shapes you want on to the grid, with the poly tool you have to draw closed shapes rather than lines.

The diagram below shows a block I have created. I have to admit I had some help from my husband with this.

The diagram above shows a block I have created. I have to admit I had some help from my husband with this.
The next step is to colour the blocks and then save them to the sketch book.(this is one step I quite often forget to do – you should save your work every time you make changes. Once you are satisfied with your blocks the next step is to open the quilt work table.

The blocks I have just created are in the top left hand corner, all I have to do is click and drag them on to the work table.

I have changed the grid to a custom design one this means I can set the blocks anywhere on the grid so you have more freedom with the design on your quilt. I have dragged the blocks onto the grid but this is not how I want my quilt to look. So this is where you can get really creative.

This shows the development of the design. I added the plain cornerstones and the flying geese blocks from the block library and again click and drag them on to worktable and then use copy and paste to fill in the grid.

And here is my finished design saved to the project sketch book. The overall size of my quilt is 22″ square but you can quite easily change the dimensions or add to the design by opening the saved file in the quilt work table.
Now we have got the design we need to make it.
For this design I used foundation paper piecing( FPP) here is the completed design. EQ8 software can help with this too but this is where it gets more complicated. You have to section the pieces and number them yourself. To do this you need to have a sound understanding of FPP.

On this screen shot I have started partitioning the block into the separate sections I will use to build the block.
Once you have finished this stage you then need to number each piece in the order in which they should be pieced. When you open the numbering screen EQ8 will have done this for you (see below) if you agree with the way they are numbered you just need to click on each number.

You need to do this with each of the blocks in your design that you want to paper piece. If you look closely you can see I have made mistakes with the sequencing of the numbers, 13 and 14 are the wrong way round but to change that I will have to renumber from scratch. This is one of my bugbears with EQ8 is you cannot save the sectioning and numbering as you work on it, so, if you make a mistake you have to go back and start again. You can print them out or you can print to PDF so you can save your work but not on to EQ8. (unless I’ve missed something, which is possible).

This shows the foundation pieces ready to print. I appreciate it is difficult to see this but another of my bugbears is that EQ8 does not play nicely with other software. You must always remember to print your pieces at full size not fit to page.
For the pieces in your quilt that do not need to be paper pieced you can print off templates and cutting diagrams. EG borders, circle centres and corner pieces/blocks.
EQ8 will also calculate fabric requirements which again you can print off. However, it will not give you the size of pieces to cut for foundation piecing. You can use the templates if you are using the freezer paper method. I don’t use this method because for me it defeats the objective of FPP as you don’t have to rotary cut all the irregular shapes.
EQ8 does not give you any assembly instructions so as you can see you do need to be fairly confident in piecing together a quilt. This is a quote from Sheena Roberts who also uses EQ8 ” As for piecing instructions, no, EQ doesn’t give piecing instructions, and it is frequently an issue for newer users that they design a quilt but then have no idea how to put it together! Just because you can create a design using templates or rotary cutting or FPP, doesn’t mean that is a good way to piece it. But having said all that, I do love the program and couldn’t manage without it!” Sheena has been using the software for 8 years for teaching and for her own use and more recently for pattern making.
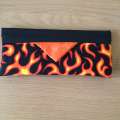
This is the quilt I made from my design

I am by no means an expert and the software is capable of a lot more than I have talked about, you can design applique patterns, quilting designs, you can import photographs and fabric swatches and lots more. The more you put into it the more you will get out of it.
I have provided a link to the printouts you get from EQ8 to design your quilt. This not a pattern, it is to give you a true picture of what the software does. Why not have a go at making the quilt form the printouts. Obviously you need to understand FPP.
https://ukqu.co.uk/shop/miscellaneous/solar-flare-pattern-by-jude-charlesworth/
The Electric quilt Company itself provides lots of online resource and classes there is also a 200 page plus manual. This is “free” if you print it yourself, there are also several books available. There also numerous videos and tutorials on you tube.
If you already have EQ8 you could use the instructions in this review to create your own version of the quilt.
Happy creating and would love to see your versions of the quilt and would appreciate and feedback.
https://jinnybeyer.com/wp-content/uploads/2020/11/Moon-Glow-2017-Pattern-w-1.pdf
This is a link to Jinny Beyer’s moonglow free pattern. She gives step-by -step instructions for 3 methods of piecing the quilt including FPP and this is where I learned how to do it. I did not make the quilt but made 6 of the stars.


Responses