
I hope you enjoy the various methods of making these cute little blocks. I love the size of 2 1/2″ squares, they are kind of my go-to size for squares, so the following tutorial is based on that size.
2 AT A TIME HSTs
This method can be used if you want 2 HSTs in the same colourway
The general formula for this method is to add 7/8″ to the finished size you require, therefore to obtain a 2″ finished, ie 2 1/2″ unfinished, you need to cut 2 7/8″ squares
However, I find I always have problems with how wonky my HST turns out and it’s nearly always undersized – to rectify that and achieve 2 1/2″ unfinished squares cut a 3″ square from your two fabrics

Draw a diagonal line, corner to corner, on one of the squares
Place fabrics right sides together as accurately as possible

Sew a line of stitching 1/4″ away from the line on either side
I tend to move my needle position over one click so that it is a scant 1/4″ seam

Place ruler on pencil diagonal line and cut

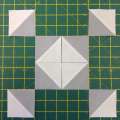
Below you will see the difference that extra 1/4″ makes and also I pressed some seams open and some to the side:
Top left – this is using 3″ squares and seam is pressed to the side
Top right – this is using 3″ squares and seam is pressed open
Bottom left – this is using 2 7/8″ squares and seam is pressed to the side
Bottom right – this is using 2 7/8″ squares and seam is pressed open
Both the examples using the 3″ squares result in enough fabric to trim to 2 1/2″ and have good true squares, with the join in the middle
Both of the bottom examples are undersized and so I would need to do again (I know other people get good results with this method so please share your tips if you do!)

And trimmed!

4 AT A TIME HSTs
This method can be used if you want 4 HSTs in the same colourway
To achieve 2 1/2″ unfinished squares cut a 4″ square from your two fabrics

Place the squares right sides together, as accurately as possible, and sew a 1/4″ seam around the outside

Cut from corner to corner one way, do not move them, and then cut corner to corner the other way

You end up with 4 HSTs measuring 2 1/2″
I press my seams open to minimise any movement of the fabric when pressing and hopefully achieve true squares

Trim the dog ears and you are ready to go!

If you like to press your seams to one side I would cut the initial squares to 4 1/4″ to allow a little wriggle room and then trim to 2 1/2″
Coming soon …. Part 2, which will include 8 HSTs at a Time and 1 at a Time HSTs – in different colourways!

Very well explained Abigail, I love the step by step images too. So easy to follow. Thank you.
Thanks for visiting and commenting Carol. I am very happy that I wrote all this down because until it becomes second nature to me it is great to be able to refer to it – rather than having to figure it out every time!