I had to join some strips of wadding together to make a big enough piece for a quilt top I had just finished and I thought I would take some photos to show how I went about it. There are lots of different ways to join your wadding bits together, but this is how I did mine. I hunted around in the cupboard of wadding bits to find some suitable pieces – they’re somewhat crumpled but the creases should come out fairly easily.
I overlapped my wadding strips very slightly but making sure there was some overlap all the way along.

Then I carefully cut though that overlap . . .

. . . so that the wadding strips butted right up to each other.

I then took them (carefully) to the machine. I had selected a triple zig-zag stitch with a maximum width and length

and used a walking foot to stitch the two lengths together.

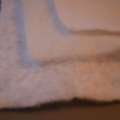
The join is virtually invisible, lies flat and shouldn’t come adrift .


I could have hand-stitched the strips together and there’s no reason why you shouldn’t – I didn’t because I know my hand-stitching over that length would have taken longer than machining and not been as secure. I also have a tendency to pull my stitches too tight which would cause the strips to overlap again. If I had any of that special tape you can get for joining wadding bits then I could have used that but I didn’t – I have never used it so I can’t tell you how good or otherwise it might be, it just seems as quick to zip the bits together under the machine.
And the quilt top to be finished is a Giant Dahlia. I just need to make a big enough backing now while the wadding hangs over the banister to help all the creases drop out – I may have to resort to the hair dryer to get the worst ones out.

I know a lot of quilters will find this really helpful, and – what a pretty quilt!
Thanks, Maggie. Of course, having sorted out the wadding and assembled a backing I now can’t find the thread I was sure I had!