Hello everyone.
We are here at the end of the series of the QuiltSewGo Beginners’ Sampler Quilt so it’s just the finishing off all your hard work over the last 15 weeks that’s left to do. Whilst preparing this blog it has turned out to be much longer than I anticipated and as I so wanted to give you as much detail as possible, I have split this into three blogs but with several pdfs in each for you to download. The link will be near the section they relate to.
Finishing your QuiltSewGo Beginners’ Sampler Quilt PART 1:
In this first blog, the pdf links are:
WITH SASHING & INNER BORDERS
WITHOUT SASHING
In the second blog the pdf links are:
BORDERS or NO BORDERS
QUILT AS YOU GO (QAYG)
Finishing your QuiltSewGo Beginners’ Sampler Quilt PART 2:
In the third blog the pdf links are:
PREPARING YOUR BACKING FABRIC
LAYERING YOUR QUILT SANDWICH
QUILTING and BINDING
This BLOG There are several different ways to make up your QuiltSewGo Beginners’ Sampler Quilt top and you might be want to take into consideration the size of your machine, your skills and confidence when choosing the right approach for YOU.
I’m going to share several options for you to consider. With all the information out there I’m not going to ‘reinvent the wheel’ or tell you that you must do it one way or another. All I ask is that you read through the blogs first, check out any blog or video links I suggest and then decide which method you want to try.
When I began my quilt journey eight years ago my sewing machine had the standard 5.5” throat that many of us have. My next purchase was a Brother NV1800q with an 8.5” throat as a machine with a 11” throat was too far out of my budget then.

I still use the smaller machine, it’s handy for taking to quilt group sessions as it’s lighter and easier to carry but my NV1800q is much easier for making up larger quilt tops. Many of our quilting group members have the smaller machines and even old Singer machines and manage to finish their quilt top successfully. It just takes practice and finding a way that suits you best.
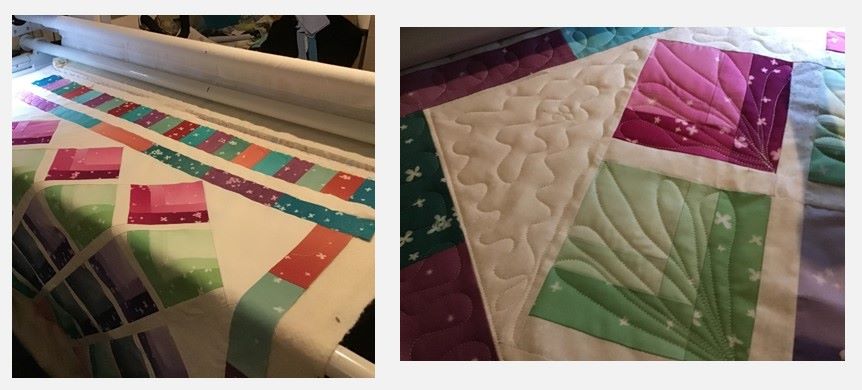
A few years ago, I decided to treat myself to a Simply Sixteen long-arm quilting machine with a Little Foot frame so now my quilting decisions are easy, I just make a standard quilt top and load it onto the quilt frame. Although I still use my NV1800q for smaller quilting projects such as baby quilts and lap quilts.
Let’s start with CONSTRUCTING your QUILT TOP using all fifteen blocks.
The first thing is to decide on your block layout – 3 blocks x 5 blocks.
This is how I’ve organised mine; you don’t need to lay yours out in the same way. Either lay it out on the floor, on a bed or pin to a design wall if you have one; mine is an old velvet curtain hung over a door – it makes a great draught excluder too!

TIP – take a photo of it on your ipad/tablet or phone and then have a look at it. Ask yourself, ‘Have I got too much of the same colour block next to each other?
Jiggle blocks around until you are happy with it and take another photo. Once you have decided, remove the other photos so you don’t get mixed up just in case you have to check back with your photo.
PLEASE DO NOT DO ANY SEWING YET: – there are more decisions to make about the method you want to use for quilting before you get to the sewing! Check out these links and decide which method you would prefer to use.
FINISH YOUR QUILTS! How to – BORDERS, BACKING, BINDING, QUILTING – For ANY Quilt Top!! By Donna Jordan https://www.youtube.com/watch?v=SE5CqpWaReA
This introduction describes the different Quilt As You Go (QAYG) methods you could use.
QUILT AS YOU GO 5 WAYS + Sharing my Quilt As You Go Design Process! https://www.youtube.com/watch?v=uZHqn4-Na-k
I quite like the video, How To Quilt As You Go: My 1 to 3 Method (No Sashing pt 2) as you can build up your quilt using sashing and row by row.

Keep Reading before Sewing!
WITH SASHING or WITHOUT SASHING?
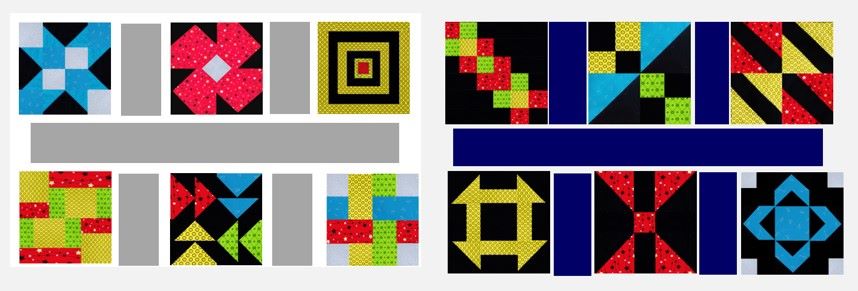
Sashing is a strip of fabric that is placed in between each block along a row and between rows to make into a larger quilt top. It also frames the individual blocks to create a different effect than if they were sewn without adding sashing.
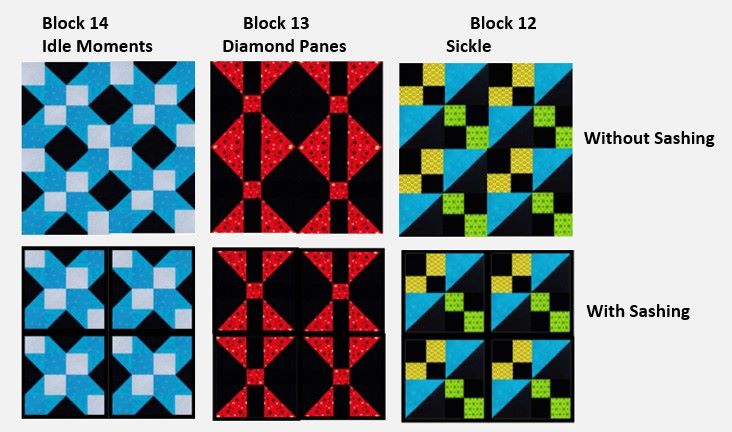
Here are some examples of single block designs showing how adding sashing creates a different finish for your quilt top. As you can see from the Sickle block, it looks much better without sashing.
If you decide to use sashing you can use a contrasting colour fabric or use the same colour as your background fabric.
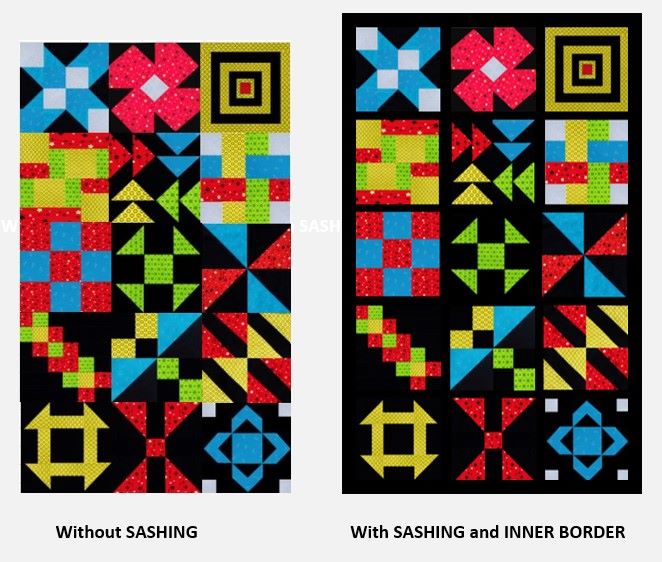
Adding sashing will make your quilt bigger (obviously); WITHOUT SASHING, once sewn together (with 0.25” seams) the fifteen blocks will measure approx. 36.5” x 60.5”.
WITH SASHING of 1.5” strips the same quilt top will measure approx. 38.5” x 64.5. By adding an INNER BORDER of 1.5” strips across the top, bottom and at each side to completely frame the blocks it will now measure approx. 40.5” x 66.5”.
You can then add a border to make it wider/longer. If you decide not to add a wider MAIN/OUTER BORDER then I would suggest adding a wider INNER BORDER to give you some leeway when quilting your top – you can always trim it down when ‘squaring’ it up before binding.
Here’s how they would look if you chose to make your blocks into a quilt top without using the QAYG method of finishing your quilt.
I decided to use the black background fabric for my quilt as I quite liked the dramatic effect it would give. I generally use 1.5” wide strips for sashing but you can use wider or narrower strips if you want to. This will make the quilt top approx.40.5” x 66.5” before adding a border.
WITH SASHING
Click HERE for the free pdf.
SASHING PART 1: ACROSS THE ROWS
Check your BLOCK size – they should be 12.5” x 12.5” square. If they are slightly smaller you can trim the sashing pieces after sewing, if bigger, then cut the strips slightly longer.
Cut ten 1.5” x 12.5” strips of your chosen sashing fabric.
NOTE: If you are making the ‘standard’ quilt top with SASHING start by adding your sashing between the blocks on your Top row. You can also use these STEPS if you are using the QAYG Row method to make up your quilt top.

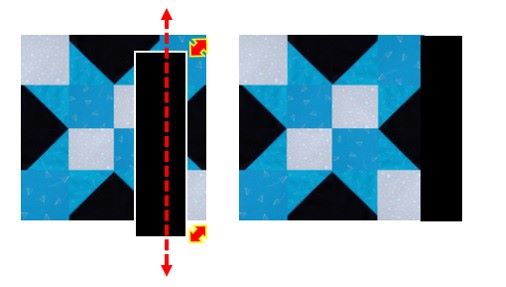
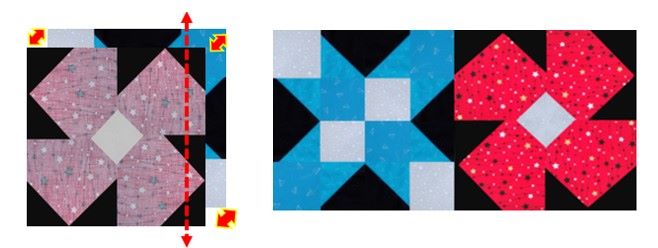
STEP 1: TOP: ROW 1: Lay out your blocks with the sashing strips between them.

STEP 2: With your first block, place it Right Side (RS) facing towards you. Align a sashing strip along the RS edge with its RS facing the block. Pin and sew along the edge using a 0.25” seam. PRESS open.
STEP 3: Lay the first block/sashing strip RS facing towards you. Flip the second block so its RS is facing down and aligned to the RS edge of the sashing strip. Pin and sew along the edge using a 0.25” seam. PRESS open.
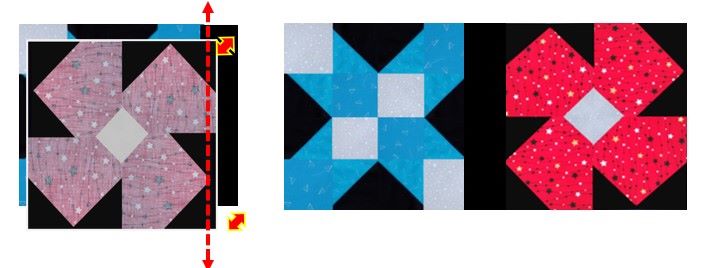
STEP 4: Place your first and second block with the Right Side (RS) facing upwards. Align a sashing strip with the RS facing the RS edge of middle block. Pin and sew along the edge using a 0.25” seam. PRESS open.
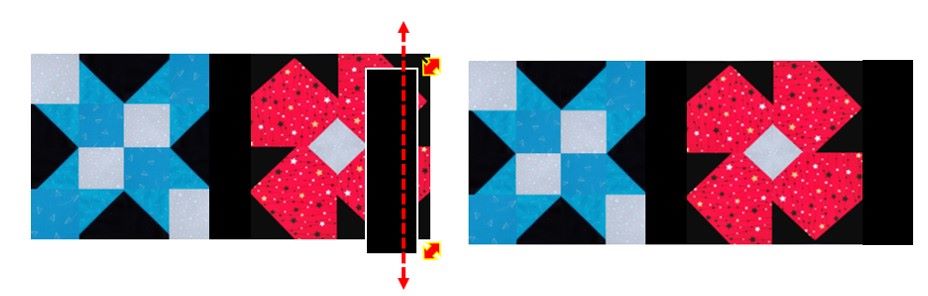
STEP 5: Place your first and second block with the Right Side (RS) facing towards you. Flip the third block with the RS facing the RS edge of middle block sashing strip. Pin and sew along the edge using a 0.25” seam. PRESS open.
This completes your Top/Row 1.

STEP 6: Repeat STEPS 1 TO 5 for the remaining rows.
SASHING PART 2: BETWEEN THE ROWS
Check the width of your ‘ROWS’ and cut your strips accordingly.
e.g., Cut four 1.5” x 38.5” strips (or WoF) for the ‘between rows’ sashing.
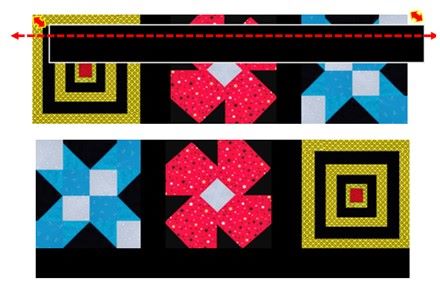
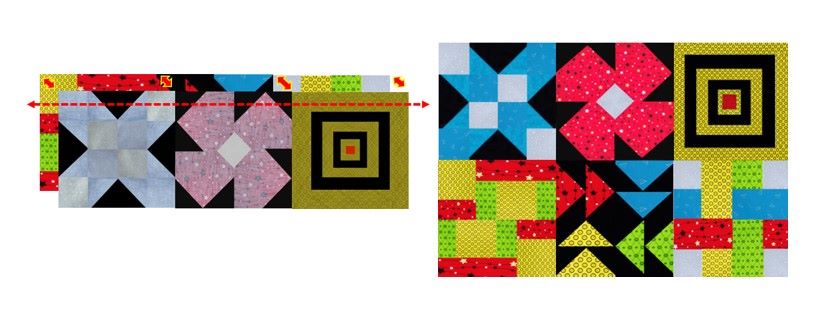
STEP 7: SASH the first row along the bottom edge, Flip Row 1 (Top row) 180⁰ (degrees) as shown below and PIN or CLIP your 1.5” x 38.5” sashing strip in place. Sew using a 0.25” seam. PRESS. Flip it back so the sashing strip is at the bottom of the first row.
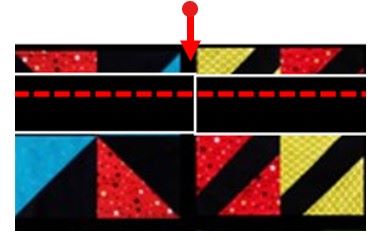
STEP 8: Sashing the Top and Second row
Lay the Second row with the Right Side (RS) facing towards you. FLIP the Top Row so it’s facing down – the sashing strip will be at the top now. Match and PIN or CLIP the seams where the blocks meet. Sew across using a 0.2 seam. PRESS.

STEP 9: Repeat STEPS 7 and 8 by sewing an ‘inner’ sashing strip on the 2nd, 3rd and 4th Rows, do not add anything to the last row just yet. PRESS before sewing the rows together.
SASHING PART 3: INNER BORDER
TIP: If you are using the same colour for your border, then you can use wider strips for STEP 10 and STEP 11 instead.
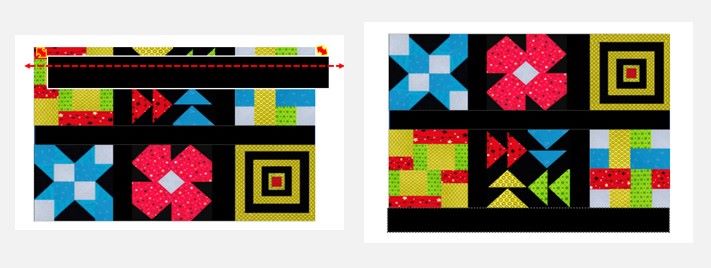
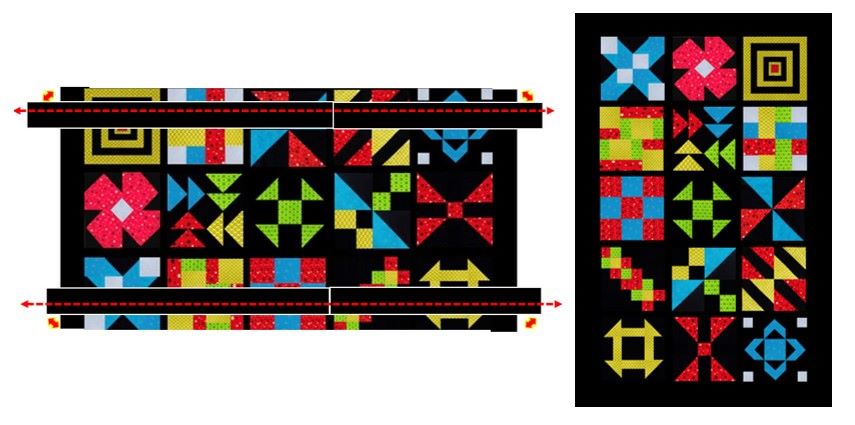
STEP 10: Cut two 1.5” x 38.5” strips (or Width of Fabric – WoF) for the top/bottom sashing/inner border. With your quilt top facing towards you, Pin or Clip an inner strip along the top. Sew a seam 0.25” from the edge. Press. Repeat by adding another strip along the Bottom edge. Press.
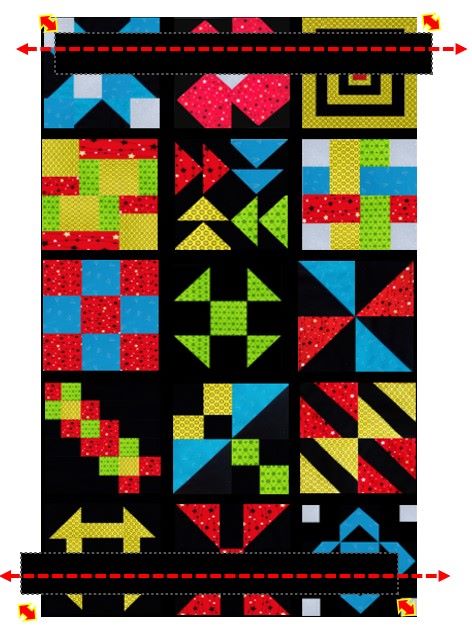
STEP 11: Cut four 1.5” x WoF strips to make the side sashing/inner border strips. Take two of these strips and join them together at the short edge using a 0.50” seam. (0.5” = ½”). Press the seam open. Trim these to the length when you attach them to each side of the quilt top.

With your quilt top facing towards you, line up the seam of your joined strip in-between two blocks. Pin or clip an inner strip along one side.
Sew a seam 0.25” from the edge. Press.
Repeat by adding another strip along the other side. Press.
WITHOUT SASHING
Click HERE for the free pdf.
WITHOUT SASHING, once sewn together (with 0.25” seams) the fifteen blocks will measure approx. 36.5” x 60.5”.
You could add an INNER BORDER of 1.5” strips across the top, bottom and at each side to completely frame the blocks which would take the measurement to approx. 38.5” x 62.5”. You can then add a border to make it wider/longer if you choose.
If you decide not to add a wider MAIN/OUTER BORDER then I would suggest adding a wider INNER BORDER to give you some leeway when quilting your top – you can always trim it down when ‘squaring’ it up before binding.
STEP 12: Row 1: Top row
With your first block, place it Right Side (RS) facing towards you. Align the middle block along the RS edge with its RS facing the block. Pin and sew along the edge using a 0.25” seam. PRESS open.
STEP 13: Place your first and second block with the RS facing upwards. Align the third block RS facing the RS edge of middle block. Pin and sew along the edge using a 0.25” seam. PRESS open. Your TOP Row is .

STEP 14: Repeat STEP 12 and STEP 13 until all the remaining rows are completed. PRESS each row.
STEP 15: JOINING THE ROWS
Place your second row with the RS facing towards you. Flip Row 1 180⁰ (degrees) onto Row 2. Align and match where the blocks and PIN or CLIP in place. Sew using a 0.25” seam. PRESS. Flip it back so Row 1 is at the top.
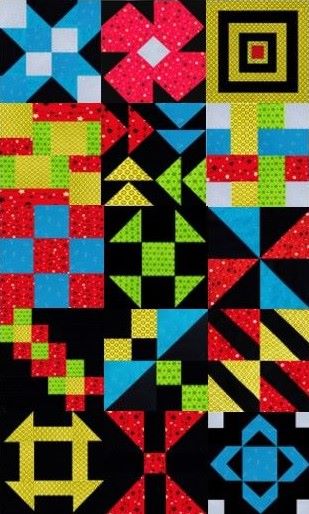
STEP 16: Repeat STEP 15 by adding the 3rd and 4th and 5th Rows in the same way. Sew using a 0.25” seam. PRESS. This is how it looks with no sashing.
I hope you have found this useful. The next blog will explain how to add BORDERS (same process as adding the Inner Borders) and takes a tentative peek as Quilt As You Go (QAYG).

Carol Lightburn
Twitter: @quiltsewgo Instagram: quiltsewgo
Twitter: @ukquilters Instagram: uk_quilters_united
Responses